# RabbitMq配置和使用
本文作者:程序员飞云
# 1. 官网
https://www.rabbitmq.com/getstarted.html
# 2. 安装
rabbitMq安装https://www.rabbitmq.com/download.html erlang安装https://www.erlang.org/patches/otp-25.3.2
# 3. windows启动命令
到解压的rabbitMqServer里面的sbin命令行输入rabbitmq-plugins.bat enable rabbitmq_management
 这个启动后会占用两个端口,5672是运行端口,15672是webUI端口,写端口的时候需要注意。
# 4. 登录控制台界面
http://localhost:15672/
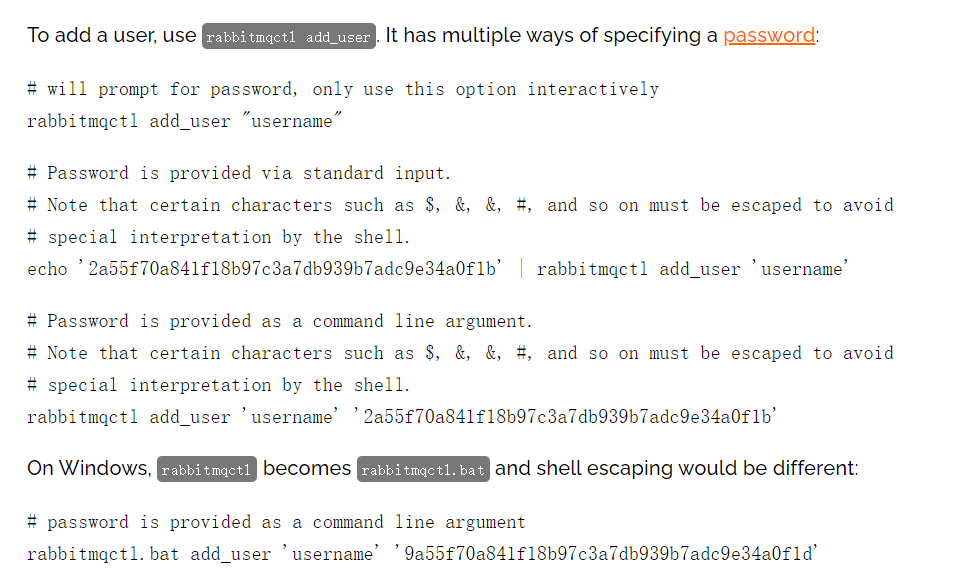
默认账号密码都是guest,如果是上线需要自己更改密码,账号赋予权限,这里仅作为单机本地部署。
官方设置https://www.rabbitmq.com/access-control.html
# 5. java版本快速入门,一对一,原生方式
https://www.rabbitmq.com/tutorials/tutorial-one-java.html
# 5.1 引入依赖
<!-- https://mvnrepository.com/artifact/com.rabbitmq/amqp-client -->
<dependency>
    <groupId>com.rabbitmq</groupId>
    <artifactId>amqp-client</artifactId>
    <version>5.18.0</version>
</dependency>
2
3
4
5
6
# 5.2 生产者
public class QuickStartMq {
    // 队列名称
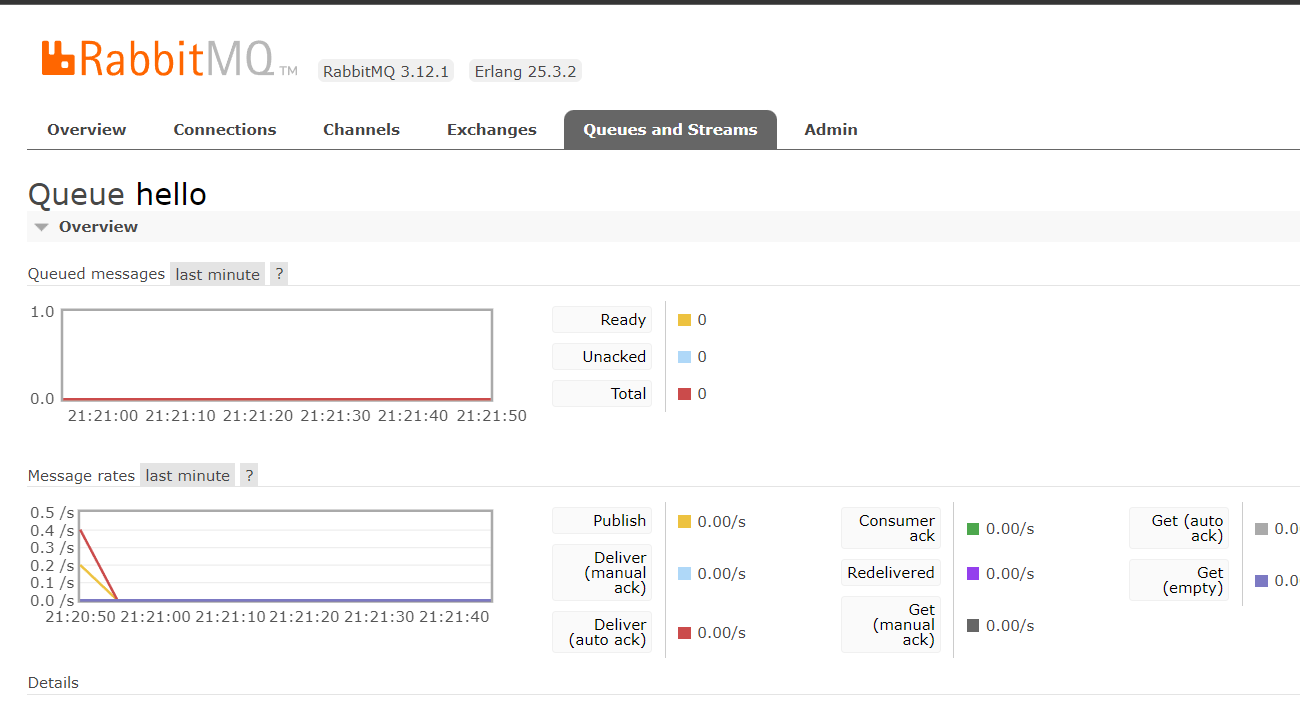
    public static final String QUEUE_NAME = "hello";

    public static void main(String[] args) throws IOException, TimeoutException {
        // 创建连接工厂
        ConnectionFactory connectionFactory = new ConnectionFactory();
        // 设置服务地址
        connectionFactory.setHost("127.0.0.1");

        // 建立连接
        Connection connection = connectionFactory.newConnection();
        // 创建通道
        Channel channel = connection.createChannel();

        // 声明队列
        channel.queueDeclare(QUEUE_NAME, false, false, false, null);

        String msg = "hello";
        // 发送消息
        channel.basicPublish("", QUEUE_NAME, null, msg.getBytes(StandardCharsets.UTF_8));
        System.out.println("[x] Waiting for messages.");
    }
}
2
3
4
5
6
7
8
9
10
11
12
13
14
15
16
17
18
19
20
21
22
23
24
 其中queueDeclare申明队列的时候有5个参数
queue: 队列名称
durable: 消息队列重启后,消息是否丢失
exclusive: 是否只允许当前创建的消息队列操作
autoDelete:删除无人使用的队列
arguments:
# 5.3 消费者
public class QuickStartConsumerMq {
    public static final String QUEUE_NAME = "hello";

    public static void main(String[] args) throws IOException, TimeoutException {
        // 创建连接工厂
        ConnectionFactory connectionFactory = new ConnectionFactory();
        connectionFactory.setHost("127.0.0.1");
        // 创建链接
        Connection connection = connectionFactory.newConnection();
        Channel channel = connection.createChannel();
        // 声明队列,如果队列在消息中间件中不存在则创建
        channel.queueDeclare(QUEUE_NAME, false, false, false, null);

        // 发送消息
        DeliverCallback deliverCallback = (consumerTag, delivery) -> {
            String message = new String(delivery.getBody(), "UTF-8");
            System.out.println(" [x] Received '" + message + "'");
        };

        // 监听队列,消费
        channel.basicConsume(QUEUE_NAME, true, deliverCallback, consumerTag -> {});

    }
}
2
3
4
5
6
7
8
9
10
11
12
13
14
15
16
17
18
19
20
21
22
23
24
# 6. 快速入门,多个消费者
https://www.rabbitmq.com/tutorials/tutorial-two-java.html 多个消费者从队列里面取出消息
# 6.1 生产者
使用Scanner手动输入消息
public class QuickStartMorePublishMq {

    public static final String QUEUE_NAME = "more_consumer_queue";

    public static void main(String[] args) throws IOException, TimeoutException {
        // 创建连接工厂
        ConnectionFactory factory = new ConnectionFactory();
        //  设置 RabbitMQ 的主机名
        factory.setHost("127.0.0.1");

        // 创建一个连接
        Connection connection = factory.newConnection();
        // 创建频道
        Channel channel = connection.createChannel();
        // 声明队列,主要为了防止消息接收者先运行,队列还不存在时创建队列。
        channel.queueDeclare(QUEUE_NAME, false, false, false, null);

        // 输入消息
        Scanner scanner = new Scanner(System.in);
        while (scanner.hasNext()) {
            String message = scanner.next();
            channel.basicPublish("", QUEUE_NAME, null, message.getBytes(StandardCharsets.UTF_8));
            System.out.println(" [x] Sent '" + message + "'");
        }
    }
}
2
3
4
5
6
7
8
9
10
11
12
13
14
15
16
17
18
19
20
21
22
23
24
25
26
27
# 6.2 消费者
使用循环来模拟多个消费者
public class QuickStartMoreConsumerMq {
    public static final String QUEUE_NAME = "more_consumer_queue";

    public static void main(String[] args) throws IOException, TimeoutException {
        ConnectionFactory factory = new ConnectionFactory();
        factory.setHost("127.0.0.1");

        Connection connection = factory.newConnection();
        for (int i = 0; i < 2; i++) {
            Channel channel = connection.createChannel();
            channel.queueDeclare(QUEUE_NAME, false, false, false, null);

            // 控制单个消费者任务积压数
            channel.basicQos(1);

            int finalI = i;

            DeliverCallback deliverCallback = (consumerTag, delivery) -> {
                String message = new String(delivery.getBody(), StandardCharsets.UTF_8);
                try {
                    // 处理工作
                    System.out.println(" [x] Received '" + "编号:" + finalI + ": " + message + "'");
                    // 确认
                    channel.basicAck(delivery.getEnvelope().getDeliveryTag(), false);
                    // 模拟及其处理
                    Thread.sleep(20000);

                } catch (InterruptedException e) {
                    e.printStackTrace();
                    channel.basicNack(delivery.getEnvelope().getDeliveryTag(), false, false);
                } finally {
                    System.out.println(" [x] Done");
                    channel.basicAck(delivery.getEnvelope().getDeliveryTag(), false);
                }
            };

            // 执行消费监听,消费者1
            channel.basicConsume(QUEUE_NAME, false, deliverCallback, consumerTag -> {
            });
        }

    }
}
2
3
4
5
6
7
8
9
10
11
12
13
14
15
16
17
18
19
20
21
22
23
24
25
26
27
28
29
30
31
32
33
34
35
36
37
38
39
40
41
42
43
44
消费者运行截图

# 7. fanout交换机
特点:会将消息转发给所有绑定到该交换机的消息队列上面去
https://www.rabbitmq.com/tutorials/tutorial-three-java.html
 默认使用
默认使用
# 7.1 生产者
public class FanoutProducer {
    public static final String FANOUT_EXCHANGE_NAME = "fanout-exchange";

    public static void main(String[] args) throws Exception {
        ConnectionFactory factory = new ConnectionFactory();
        factory.setHost("127.0.0.1");

        //  创建一个连接
        Connection connection = factory.newConnection();

        // 创建一个通道
        Channel channel = connection.createChannel();
        // 声明fanout交换机
        channel.exchangeDeclare(FANOUT_EXCHANGE_NAME, BuiltinExchangeType.FANOUT);
        // 发送消息
        Scanner scanner = new Scanner(System.in);
        while (scanner.hasNext()) {
            String message = scanner.next();
            channel.basicPublish(FANOUT_EXCHANGE_NAME, "", null, message.getBytes());
            System.out.println(" [x] Sent '" + message + "'");
        }
    }
}
2
3
4
5
6
7
8
9
10
11
12
13
14
15
16
17
18
19
20
21
22
23
24
# 7.2 消费者
public class FanoutConsumer {
    public static final String FANOUT_EXCHANGE_NAME = "fanout-exchange";

    public static void main(String[] args) throws Exception {
        ConnectionFactory factory = new ConnectionFactory();
        factory.setHost("127.0.0.1");

        Connection connection = factory.newConnection();

        // 创建两个信道,将两个信道绑定到同一个交换机上
        Channel channelA = connection.createChannel();
        Channel channelB = connection.createChannel();

        Channel channelC = connection.createChannel();

        channelA.exchangeDeclare(FANOUT_EXCHANGE_NAME, BuiltinExchangeType.FANOUT);
        String queueNameA = "A 队列";
        channelA.queueDeclare(queueNameA, false, false, false, null);
        channelA.queueBind(queueNameA, FANOUT_EXCHANGE_NAME, "");

        String queueNameB = "B 队列";
        channelA.queueDeclare(queueNameB, false, false, false, null);
        channelA.queueBind(queueNameB, FANOUT_EXCHANGE_NAME, "");


        String queueNameC = "C 队列";
        channelC.queueDeclare(queueNameC, false, false, false, null);


        System.out.println(" [*] Waiting for messages. To exit press CTRL+C");

        DeliverCallback deliverCallbackA = (consumerTag, delivery) -> {
            String message = new String(delivery.getBody(), "UTF-8");
            System.out.println(" A Received '" + message + "'");
        };

        DeliverCallback deliverCallbackB = (consumerTag, delivery) -> {
            String message = new String(delivery.getBody(), "UTF-8");
            System.out.println(" B Received '" + message + "'");
        };

        DeliverCallback deliverCallbackC = (consumerTag, delivery) -> {
            String message = new String(delivery.getBody(), "UTF-8");
            System.out.println(" C Received '" + message + "'");
        };


        channelA.basicConsume(queueNameA, true, deliverCallbackA, consumerTag -> {
        });
        channelB.basicConsume(queueNameB, true, deliverCallbackB, consumerTag -> {
        });

        channelC.basicConsume(queueNameC, true, deliverCallbackC, consumerTag -> {
        });
    }
}
2
3
4
5
6
7
8
9
10
11
12
13
14
15
16
17
18
19
20
21
22
23
24
25
26
27
28
29
30
31
32
33
34
35
36
37
38
39
40
41
42
43
44
45
46
47
48
49
50
51
52
53
54
55
56
消费者接收信息
 只有绑定交换机的队列才能接收信息
# 8. Direct交换机
根据相应的路由键将消息转发到特定的队列
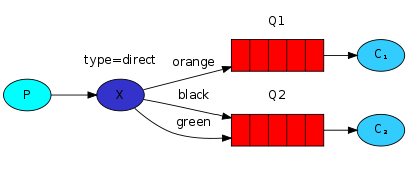 用于日志系统
# 8.1 生产者
public class DirectProducer {
    public static final String DIRECT_EXCHANGE = "exchange-direct";

    public static void main(String[] args) throws Exception {
        ConnectionFactory factory = new ConnectionFactory();
        factory.setHost("127.0.0.1");

        Connection connection = factory.newConnection();
        Channel channel = connection.createChannel();
        channel.exchangeDeclare(DIRECT_EXCHANGE, "direct");

        Scanner scanner = new Scanner(System.in);
        while (scanner.hasNext()) {
            // 输入两个数据,以空格分开,第一个指定路由键,第二个是输入的信息
            String userInput = scanner.nextLine();
            String[] strings = userInput.split(" ");
            if (strings.length < 1) {
                continue;
            }
            String routingKey = strings[0];
            String message = strings[1];
            channel.basicPublish(DIRECT_EXCHANGE, routingKey, null, message.getBytes());
            System.out.println(" [x] Sent '" + routingKey + "':'" + message + "'");
        }
    }
}
2
3
4
5
6
7
8
9
10
11
12
13
14
15
16
17
18
19
20
21
22
23
24
25
26
27
# 8.2 生产者代码
指定两个队列AA,BB,将队列绑定到对应的路由键上面去
public class DirectConsumer {
    public static final String DIRECT_EXCHANGE = "exchange-direct";

    public static void main(String[] args) throws IOException, TimeoutException {
        ConnectionFactory factory = new ConnectionFactory();
        factory.setHost("127.0.0.1");

        Connection connection = factory.newConnection();
        Channel channel = connection.createChannel();
        channel.exchangeDeclare(DIRECT_EXCHANGE, "direct");

        String queueNameAA = "direct-AA-queue";
        // 绑定路由"AA"
        channel.queueDeclare(queueNameAA, false, false, false, null);
        channel.queueBind(queueNameAA, DIRECT_EXCHANGE, "AA");


        String queueNameBB = "direct-BB-queue";
        // 绑定路由"BB"
        channel.queueDeclare(queueNameBB, false, false, false, null);
        channel.queueBind(queueNameBB, DIRECT_EXCHANGE, "BB");

        DeliverCallback deliverCallbackAA = (consumerTag, delivery) -> {
            String message = new String(delivery.getBody(), StandardCharsets.UTF_8);
            System.out.println(" AA Received '" +
                    delivery.getEnvelope().getRoutingKey() + "':'" + message + "'");
        };

        DeliverCallback deliverCallbackBB = (consumerTag, delivery) -> {
            String message = new String(delivery.getBody(), StandardCharsets.UTF_8);
            System.out.println(" BB Received '" +
                    delivery.getEnvelope().getRoutingKey() + "':'" + message + "'");
        };

        // aa,bb确认接收
        channel.basicConsume(queueNameBB, true, deliverCallbackBB, consumerTag -> {
        });

        channel.basicConsume(queueNameAA, true, deliverCallbackAA, consumerTag -> {
        });
    }
}
2
3
4
5
6
7
8
9
10
11
12
13
14
15
16
17
18
19
20
21
22
23
24
25
26
27
28
29
30
31
32
33
34
35
36
37
38
39
40
41
42
43
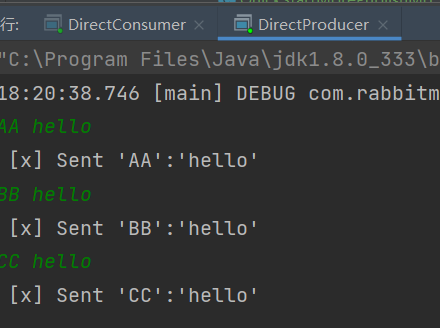
 里面只存在AA,BB路由键,没有CC路由键,所以接收不到信息。
# 9. Topic交换机
topic交换机解决了Direct只能转发到固定的路由键,里面加入了模糊匹配队列,*一个单词 a.orange,b.orange # 0个或多个单词 lazy.helo lazy.hello2
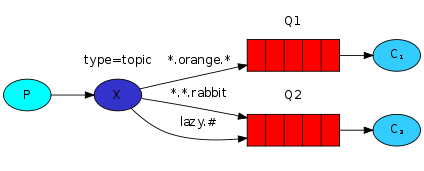 https://www.rabbitmq.com/tutorials/tutorial-five-java.html
# 9.1 生产者
将消息分成两部分,第一个传递的消息,第二个传递的路由键,这里可以模糊匹配,例如后端.产品
public class TopicProducer {

    public static final String EXCHANGE_NAME = "topic_exchange";

    public static void main(String[] args) throws Exception {
        ConnectionFactory factory = new ConnectionFactory();
        factory.setHost("127.0.0.1");

        try (Connection connection = factory.newConnection();
             Channel channel = connection.createChannel()) {

            channel.exchangeDeclare(EXCHANGE_NAME, "topic");

            Scanner scanner = new Scanner(System.in);
            while (scanner.hasNext()) {
                String userInput = scanner.nextLine();
                String[] strings = userInput.split(" ");
                if (strings.length < 1) {
                    continue;
                }

                String message = strings[0];
                String routeKey = strings[1];

                // 指定发送交换机
                channel.basicPublish(EXCHANGE_NAME, routeKey, null, message.getBytes(StandardCharsets.UTF_8));
                System.out.println(" [x] Sent  routeKey: '" + routeKey + "':'" + message + "'");
            }
        }
    }
}
2
3
4
5
6
7
8
9
10
11
12
13
14
15
16
17
18
19
20
21
22
23
24
25
26
27
28
29
30
31
32
# 9.2 消费者
指定三个队列前端,后端,产品,分别绑定对应的路由键,使用模糊匹配
public class TopicConsumer {
    public static final String EXCHANGE_NAME = "topic_exchange";

    public static void main(String[] args) throws Exception {
        ConnectionFactory factory = new ConnectionFactory();
        factory.setHost("localhost");
        Connection connection = factory.newConnection();
        Channel channel = connection.createChannel();

        channel.exchangeDeclare(EXCHANGE_NAME, "topic");

        // 队列前端
        String queueName = "frontend_queue";
        channel.queueDeclare(queueName, true, false, false, null);
        // 绑定
        channel.queueBind(queueName, EXCHANGE_NAME, "#.前端.#");

        // 队列后端
        String queueNameBB = "backend_queue";
        channel.queueDeclare(queueNameBB, true, false, false, null);
        // 绑定
        channel.queueBind(queueNameBB, EXCHANGE_NAME, "#.后端.#");

        // 队列产品需求
        String queueNameCC = "product_queue";
        channel.queueDeclare(queueNameCC, true, false, false, null);
        // 绑定
        channel.queueBind(queueNameCC, EXCHANGE_NAME, "#.产品.#");

        System.out.println(" [*] Waiting for messages. To exit press CTRL+C");

        DeliverCallback deliverCallback = (consumerTag, delivery) -> {
            String message = new String(delivery.getBody(), StandardCharsets.UTF_8);
            System.out.println(" 前端 Received '" +
                    delivery.getEnvelope().getRoutingKey() + "':'" + message + "'");
        };
        channel.basicConsume(queueName, true, deliverCallback, consumerTag -> {
        });


        DeliverCallback deliverCallbackBB = (consumerTag, delivery) -> {
            String message = new String(delivery.getBody(), StandardCharsets.UTF_8);
            System.out.println(" [后端] Received '" +
                    delivery.getEnvelope().getRoutingKey() + "':'" + message + "'");
        };
        channel.basicConsume(queueNameBB, true, deliverCallbackBB, consumerTag -> {
        });


        DeliverCallback deliverCallbackCC = (consumerTag, delivery) -> {
            String message = new String(delivery.getBody(), StandardCharsets.UTF_8);
            System.out.println(" 产品 Received '" +
                    delivery.getEnvelope().getRoutingKey() + "':'" + message + "'");
        };
        channel.basicConsume(queueNameCC, true, deliverCallbackCC, consumerTag -> {
        });
    }
}
2
3
4
5
6
7
8
9
10
11
12
13
14
15
16
17
18
19
20
21
22
23
24
25
26
27
28
29
30
31
32
33
34
35
36
37
38
39
40
41
42
43
44
45
46
47
48
49
50
51
52
53
54
55
56
57
58
59

 只有产品和后端收到了,前端没有收到消息
# 10. headers交换机
性能较差,不推荐,不依赖于任何的路由键,只依靠与headers里面的属性进行匹配
# 11. 消息过期机制TTL
https://www.rabbitmq.com/ttl.html 可以给每个消息一个过期值,清理过期数据,可以搭配死信队列使用。
Map<String, Object> args = new HashMap<String, Object>();
args.put("x-message-ttl", 60000);
channel.queueDeclare("myqueue", false, false, false, args);
2
3
指定某条消息过期
byte[] messageBodyBytes = "Hello, world!".getBytes();
AMQP.BasicProperties properties = new AMQP.BasicProperties.Builder()
                                   .expiration("60000")
                                   .build();
channel.basicPublish("my-exchange", "routing-key", properties, messageBodyBytes);
2
3
4
5
# 12. 死信机制
https://www.rabbitmq.com/confirms.html 死信队列并不是什么特殊的队列,只是一个普通的消息队列,主要用于处理那些消息过期,消息被拒绝,队列满了的特殊情况,所以称之为死信队列
# 13. 消息确认机制
为了保证消息成功被消费,里面提供了消息确认机制。 ack: 消费成功 nack: 消费失败 reject:拒绝消费
# 14. SpringBoot结合RabbitMQ使用
https://spring.io/guides/gs/messaging-rabbitmq/ 使用官方的主要优点是不需要每次都要写一堆创建流程,只需要引入依赖,编写配置,就可以进行使用。
# 14.1 依赖
<dependency>
    <groupId>org.springframework.boot</groupId>
    <artifactId>spring-boot-starter-amqp</artifactId>
    <version>2.7.2</version>
</dependency>
2
3
4
5
# 14.2 yml配置
	rabbitmq:
		host: localhost
		port: 5672
		password: guest
		username: guest
2
3
4
5
# 14.3 简单配置信道,队列
public class RabbitMqConfig {
    public static void main(String[] args) {
        try {
            ConnectionFactory connectionFactory = new ConnectionFactory();
            connectionFactory.setHost("localhost");

            Connection connection = connectionFactory.newConnection();
            Channel channel = connection.createChannel();
            String channelExchange = "order_exchange";
            channel.exchangeDeclare(channelExchange, "direct");

            String queueName = "order_queue";
            channel.queueDeclare(queueName, false, false, false, null);

            channel.queueBind(queueName, channelExchange, "my_routingKey");
        } catch (Exception e) {
            // 自定义异常
            throw new BusinessException(ErrorCode.SYSTEM_ERROR);
        }
    }
}
2
3
4
5
6
7
8
9
10
11
12
13
14
15
16
17
18
19
20
21
这个方法只需要启动一次就可以,之后就可以注释掉。
# 14.4 生产者代码
@Component
public class MyMessageProducer {

    @Resource
    private RabbitTemplate rabbitTemplate;

    private void sendMessage(String exchange,String routingKey,String message){
        rabbitTemplate.convertAndSend(exchange,routingKey,message);
    }
}
2
3
4
5
6
7
8
9
10
# 14.5 消费者代码
@Component
@Slf4j
public class MyMessageConsumer {

    @SneakyThrows
    @RabbitListener( queues = {"order_queue"}, ackMode = "MANUAL" )
    public void receiveMessage(String message, Channel channel, @Header( AmqpHeaders.DELIVERY_TAG ) long deliverTag) {
        log.info("receive message = {}", message);
        channel.basicAck(deliverTag, false);
    }
}
2
3
4
5
6
7
8
9
10
11
